Welcome

This blog is about our journey of fixing up our house. We have learned a lot and have a lot to learn. Our goals on this journey are to: work hard, save money and make it our own. We have felt such satisfaction and love making this house our home. We hope that we can help you to do the same. Happy fixing...

Sunday, November 11, 2012

just a few wish list items...

A couch, a sectional really. I want a big cozy sectional that the whole family can snuggle up on. I would love on with removable cushion covers that I can wash. I really want the cozy snuggle corner, you know the part that everyone claims as their own because it just sucks you in and you never want to get up.
 
Here is one from Pottery Barn that I like. The price tag will never do though. I could justify the price in a few years but on this budget it isn't going to work out for me.


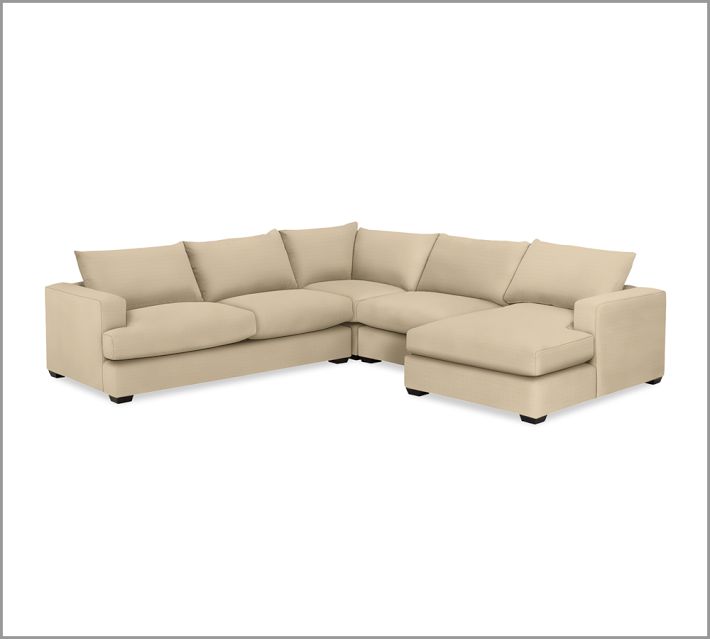
Pottery Barn Hampton Sectional - $6,500
 
I really love the lines of this one from Crate and Barrel

Crate and Barrel Domino - $4,000
 
Part of me really just wants a cozy yellow sofa with some giant arm chairs.
Anthropologie - Atelier $4,500
Anthropologie - Linen Corrigan Chair $1,700
Crate and Barrel - Chair and a half $800
{This one would such a great clean slate for a throw blanket and a few pillows)
 
Well, that was fun... now to searching craigslist cause I can't afford any of these...
 
Rug for the front entry that I really, really want:
West Elm, ZigZag rug - $149
 
Rug from Crate and Barrel that is a little more affordable:
Crate and Barrel - Olin Grey Rug $49
 
 Curtains from PB - $119 per panel
West Elm - $59 per panel
Ikea - Aina Curtains $49 per set
{Getting closer}
Overstock - Faux Silk Curtains $19.99 per set
{I might get one set for the guest room and see how I like them.}
 
Opps, Noah published this and I am not done. More tomorrow...
 

Thursday, October 18, 2012

hanging the mirror

We finally hung the mirror.
 Ta da! I have been so nervous about what mirror I should get for our mantle. It was between a gold leaf oval mirror (above) or a round wood mirror. I decided on the oval. I was going for a whimsical, clean, warm feel.I bought this one from overstock.com so I couldn't really see it in the flesh (or in the wood?). Which it is by the way, heavy wood. I am very pleased with my purchase. It is very sturdy and beautiful. I wish I could bump up the size about 7% but do love it. Want to know what else I love? Dan hanging it. It took about an hour but was placed perfectly.
Because of this...

..and this.
This guy is so busy. Doctor by day, personal contractor by night.
 
Next on the list of mantle-business is the stone/concrete area that surrounds the fireplace. Any thoughts?


Sunday, October 14, 2012

how to paint kitchen cupboards

kitchen cupboards 

Whew...

This was our first big project on our house. It was a good one to start with because it made some of the other projects we have done since seem like a stroll in the park. Don't let it scare you. It is not hard, just time consuming. What is that saying? "Good things don't come easy." or a quote from Jef Holm's facebook page, "What comes easy won't last. What lasts won't come easy." Wow, he is so smart! He must be a DIYer. We want these cupboards to last so let's hope it's not too easy. I was so scared to mess up my cupboards but I didn't. Yay! Are they perfect? No. Do they look way better? YES! Do I love them? You betchya. If you are thinking about painting yours I would definitely say do it. I think if you follow the steps I am going to give you and do your best you will LOVE the results.
This is what I looked like for a couple of weeks.

I'll list all the steps and then go through each one:

1. Remove hardware and cupboard doors (number doors).
2. Fill in holes and nicks with wood filler. Let it dry and sand it down.
3. Wipe down with TSP cleaner (and rinse with water).
4. Prime.
5. Sand. Then vacuum and wipe down.
6. Prime.
7. Sand. Then vacuum and wipe down.
8. Paint.
9. Lightly sand, vacuum and wipe down.
10. Paint final coat.
11. Re-hang and add hardware.


1. Remove hardware and cupboard doors.
This one I left for Dan to do while I went to purchase the supplies. He did a great job. He put the hinges and magnetic pulls in baggies inside of the cupboards that they belonged to. We decided to get new knobs so he didn't have to keep track of those. He also used post-it notes label the cupboard doors and the inside cupboards so we would know where to replace them when finished.


2. Fill in the holes and nicks with wood filler.
Dan filled in all of the holes that were left by the knobs because we wanted to move the knobs down from where they sat before. So he filled them with wood filler, let that dry and then sanded it down so it was smooth for painting.

3.Wipe down with TSP cleaner.
This stuff is intense. I always forget to wear rubber gloves when I am supposed to. Don't forget when using this stuff. My hands were so dried out that layers of skin came off and my nails frayed and started peeling off. Gross! Don't forget the gloves. This stuff saves time and gets into places a sander can't. After you wipe them off and get all of the grease and shine off then remember to get clean water and wipe them down again so the primer will stick.

4. Prime.
I used a Zinsser oil-based primer. It adhered nicely but it was a pain because I had to wear a respirator because it is oil-based. If I were to do it over again I would use Zinsser odorless. It is low VOC and covers and adheres very well. I used it on my fireplace recently. Let it dry. Flip it over and then do the other side. I would start with the insides first to give the best finish to the outside by letting dry longer without having to flip it right away. Don't forget to get the base of your cupboard in the kitchen :)

5.Sand.
Lightly sand the whole surface for a smooth finish. I vacuumed and wiped it down before I did another coat because I didn't want ANY dust in my paint.

6. Prime again.
I didn't do this but I wish I would have. I had to do 3 layers of paint and I feel like the paint is not as forgiving as the primer. Meaning you can sand down the primer for a smoother finish.

7. Sand, vacuum and wipe...again.

8. Paint.
I used Benjamin Moore's Waterborne Satin Impervo paint in White Dove (color). It went on really smooth, perhaps a little runny. I painted the detail first, then the inside flat part, then the surrounding flat part and then the sides. Let it dry and then flip just like with the primer (I would start with the inside part first).


9. Sand.
Lightly sand, vacuum and wipe. You want to get a nice smooth finish and remove any imperfections, i.e. dust, hair, runs, drips, brush strokes, etc.

10. Paint.
This is your final coat. You are almost there! It will be SO worth it. Finish strong and paint those doors using nice long strokes and remembering to get any drips or runs this time with your brush because you don't want to sand AGAIN. Let these puppies dry for a while. A few days if you can. The Impervo will harden the longer you give it. You don't want any nicks in the re-hanging process.

11. Re-hang and add hardware.
After the doors have dried re-hang the doors. Add hardware, knobs or pulls. If you are using new hardware make sure you drill the holes in right spot. Measure twice (or thrice), drill once.
Yay, now you get to reap your reward. You get to enjoy a brand new look in your kitchen. You also worked hard, saved money and made it your own.
 
What you'll need:

Primer
Paint
Sand paper 100-grit (clog free)
Vacuum with a hose
Rags
TSP cleaner
A few great paint brushes (I used Purdy)
Knobs/Pulls 
Painter's tape (I use Frog tape)
Wood filler
Puddy knife
Drill

a few more pics...

Wednesday, October 10, 2012

paint colors

paint colors
 
 
I have been a painting fool for the last few months. I will have many painting posts but this one is just about finding colors and what colors I have used. Whoever loves pinterest raise your hand. This is how I start. I type in "gray paint" or "living room paint" then I look through and pin the colors that I am drawn to. Then I go to this blog. It is called Favorite Paint Colors. You can either type in the colors that you found or continue your search either looking by colors, or rooms. They have pictures from other DIYers. I find this so helpful because the paint samples I see or bring home are so hard to visualize in an actual room. If they don't have the color I am interested in then I just "google image" it. I am so much happier with my paint colors this way. The old way of just searching through paint samples at the "tool store" never really worked out for me. The color on the little card looks totally different when it is on a wall.
 
 
Here are the colors I have in my house:
 
 
Front door - Benjamin Moore, Wythe Blue
 
 
Kitchen, breakfast nook and entry - Benjamin Moore, Early Morning Mist 1528
 
 
Front room - Benjamin Moore, Rockport Gray (probably my favorite right now)


Dining room - Benjamin Moore, Moonshine

 
Master bedroom - Benjamin Moore, Stonington Gray
 
 
Nursery - Sherwin Williams, Sea Salt (added white paint)


Guest room - Restoration Hardware, Silver Sage

 
Kitchen cabinets - Benjamin Moore, White Dove

 
Trim - White Dove
 
*Tip - I didn't know you could do this when I started so I will share it. You can basically get any color you want from a vendor of your choice. For example: You really love that color in the Pottery Barn catalog but you don't want to pay $60+ for the Benjamin Moore paint. Well you don't have to! Most places (Lowes, Home Depot, Sherwin Williams, etc.) have the color codes from competetors in their computer. I am not saying anything about the quaility of paint here, just the color. It might be a touch off but I have had great results using Sherwin Williams paint in Benjamin Moore colors.

First Post

We'll take it!
Yay, my first post! This has been a crazy five months. Longer than that really but 5 months of fix'n up the house. In February we found out where we would be living for the next 4 years. My husband, Dan, had been applying for emergency medicine residency programs. You know on Scrubs that crazy time in a doctor's life when they work all the time and don't really get much of a paycheck. I know, I know, what a perfect time to buy a fixer upper. Well that is what we did. We bought a lovely pile of work and we love it. With the internet and iPhone apps we were able to only go out with our realtor one time, it was actually the very first house we looked at. With 3 little boys and Dan busy with graduating from med school I am SO grateful that I didn't have to walk through 50 houses. If you are buying a house or if you're a real estate nerd (like me) you should check out Trulia and Zillow. They have great apps too.


Why this house? The location is perfect! Close to work, preschool and school. It is a beautiful street with great neighbors. The layout is exactly what we wanted. The bedrooms are all on the same floor. On the third floor there is a guest room with a bathroom. There is a nice big basement for the boys to play in. Oh, and four toilets! We have only ever had 1, um yeah. A mudroom was on my list of "must haves". With snow, mud or slush for half the year I NEEDED a place for all of our weather armor. When it comes down to it, it just felt right. When we looked past the pink carpet, the palm tree wallpaper, the nasty faux brick linoleum the bones were perfect!

When we first got the keys to our home we had 1 month until we had to move out of our other place. Luckily they are only about a mile apart because for that month we worked on the house all the time! The first big project was the kitchen cabinets. Then painting as much as we could before we tore out about 1600 ft. of carpet so that our wood floors could be refinished. We have learned a lot. We have a lot more to learn and do. In this blog I will post our projects and progress. We are NOT professional. We are just a young family trying to make our home cozy, comfortable and functional for us. We have used the internet to do research before we start our projects. My advice to you is to read and visualize your projects as much as possible so that you can feel comfortable with anything that might come up. Don't cut corners! Take off hardware before you paint! Try not to get discouraged.  Have fun with your fellow DIYer (if you have one). Projects don't usually go as planned and always take longer than you think they will. This can be a source of contention if you let it. It can also allow for some great bonding time with your helper and your house.

I have 5 months of blogging to catch up on so I will be back blogging for a little while. If there is a specific project you would like to know more about comment or email me paisleyem@gmail.com and I will try to work on that post sooner or answer any questions via email. I will be continually updating the pictures on the rooms so check back and see the progress! Check out the tabs on top for room progress and before/current pics.